This tutorial was written by me on February 18th, 2014 and is my own creation. Any resemblance to any other tutorial is purely coincidental and unintentional.
PSP Version used: PSP X5 but should work in other versions.
This tutorial assumes you have a good working knowledge of PSP.
Supplies:
Tube of choice. I am using the art of Elias Chatzoudis. I purchased this tube when the artist was with PSP Tubes Emporium. You may now purchase his tubes here.
FTU Rock Girlz Rule by Kandii Popz Dezignz. This kit is her 500 likes freebie. Scroll down to grab the freebie.
Template 205 by Toxic Desirez. You can find it here.
Mask 27 by Gem’s Taggin Scraps. You can find it here.
Texture 15 by VixPSP. You can find it here.
Font of choice. I am using Skullphabet One.
Filters (Optional)
EyeCandy 5 Impact: Bevel
——————–
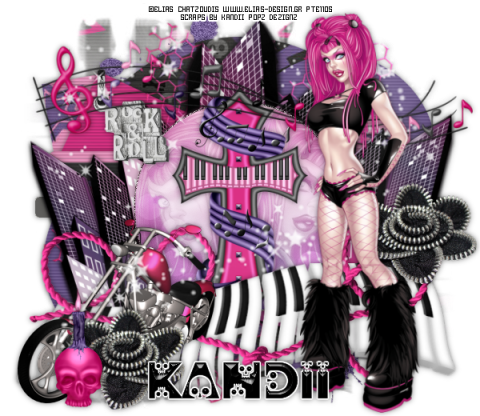
Open your template & mask. Minimize your mask for now. On your template, set the canvas size to 850 x 737. Resize all layers by 71%. Delete the credits layer & Raster 11.
Open 3. Copy & Paste above the background layer. Apply your mask, merge group.
Now add your papers to each layer:
Raster 8 – Paper2
Raster 9 & Copy of Raster 9 – Paper4
Raster 6 & Copy of Raster 6 – Paper9
Raster 7 & Copy of Raster 7 – Paper10
Raster 2 – Paper4
Raster 10 – manual color correction. Set the source to #fefbef and the target to #5f5e5c
Raster 5 & Copy of Raster 5 – Paper8
Copy (2) of Raster 1 – add a new raster layer and floodfill with #5f5e5c. Add noise, gaussian, 100, monochrome checked
Copy of Raster 1 – add a new raster layer, create a linear gradient of your choice, repeats 0. Floodfill with your gradient.
Open your tube. My tube has two closeups with it, so I am using one of the closeups. Place over the left side of the gradient layer. Duplicate, flip horizontal and place to the right side of the gradient layer. Move the duplicate below the original. Merge the tubes together.
On the gradient layer, select all, float, defloat. On the merged tubes layer, selections, invert and press delete. Deselect.
Duplicate the tubes layer, gaussian blur 3.00. Set the blend mode to Screen, opacity 50. On the original merged layer, set the blend mode to Luminance(L), opacity 40.
Open your texture, Shift+L, 0, 0. Copy and paste as a new layer above your tube layers. On the gradient layer, select all, float, defloat. On the texture layer, selections, invert and press delete. Deselect.
Now for the elements:
Splats – resize by 83%. Move this layer just above the mask layer.
Wire – resize by 97%. Rotate to the right 40 degrees. Move this layer so it is just above the striped paper layer.
City – resize by 92%. Place above the wire layer.
Charm – resize by 50%. Place above the texture layer, to the top left.
Cross – resize by 60%. Place between to the 2 tubes.
MusicNotes – resize by 92%. Place to the top of your template.
Keyboard – resize by 92%, flip horizontal. Place to the bottom.
Rope – flip vertical and place over the keyboard.
Bike – resize by 50%. Place to the bottom left.
Sparkles2 – resize by 85%.
Flower2 – resize by 60%. Place to the top right corner of the keyboard. Duplicate, flip horizontal and place to the bottom of the bike.
Open your full-size tube and resize as necessary. Place to your liking.
Candle – resize by 50%. Place to the left of the duplicate flower.
Now add your name, and apply the settings of choice for EyeCandy 5 Impact: Bevel.
Add your copyright & license info. You may apply a gradient glow if desired.
What I do is on the text layer, select all, float, defloat. Selections, expand by 2. Then add a new raster layer and floodfill with the color of my choice. I move this layer below the text layer and merge the text with this layer.
Apply a drop shadow of choice to your layers. Merge visible and save as a PNG.
Thanks for checking out my tutorials.


You must be logged in to post a comment.